Terms and Abbreviations:
SC – Single Crochet
INC – Increase (2 SC in one stitch)
DEC – Decrease (SC 2 together)
SS – Slip Stitch
Amigurumi Ring
PATTERN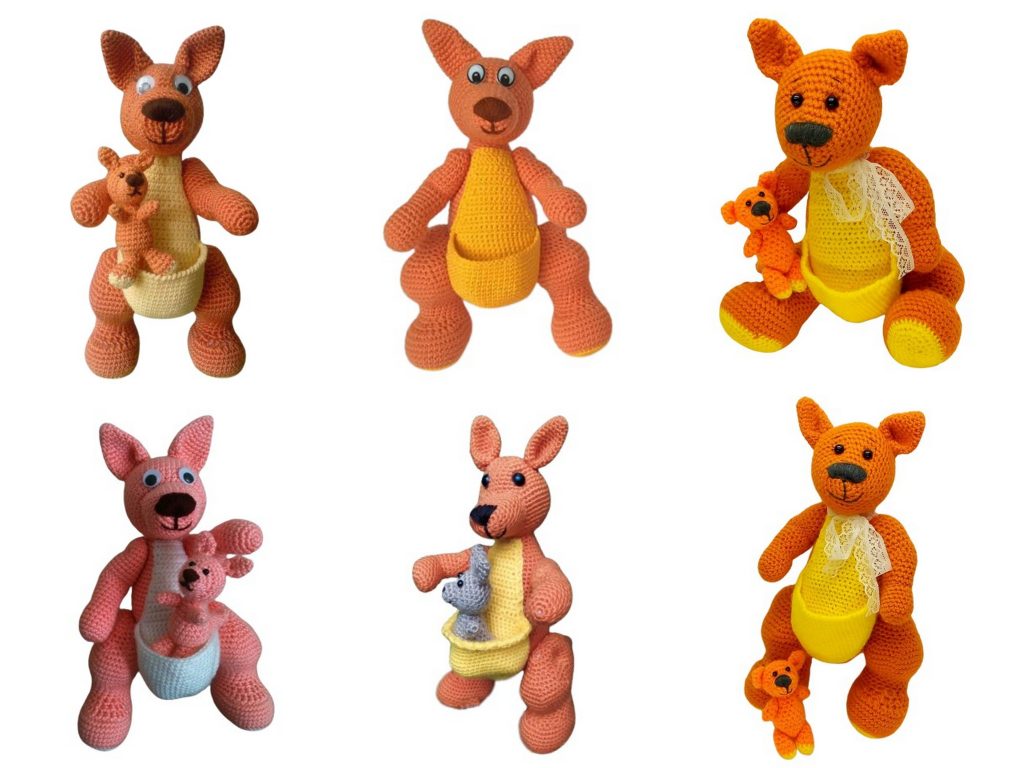
Mama Kangaroo
Head
Crochet with brown yarn.
Round 1: 6 SC into the amigurumi ring.
Round 2: INC in each stitch around. (12)
Round 3: (1 SC, INC) – repeat 6 times. (18)
Round 4: (2 SC, INC) – repeat 6 times. (24)
Round 5: (3 SC, INC) – repeat 6 times. (30)
Round 6: 30 SC
Round 7: (4 SC, INC) – repeat 6 times. (36)
Round 8: (5 SC, INC) – repeat 6 times. (42)
Round 9: 42 SC
Round 10: (6 SC, INC) – repeat 6 times. (48)
Rounds 11-16: 48 SC
Round 17: (6 SC, DEC) – repeat 6 times. (42)
Round 18: (5 SC, DEC) – repeat 6 times. (36)
Round 19: 36 SC
Round 20: (4 SC, DEC) – repeat 6 times. (30)
Round 21: 30 SC
Round 22: (3 SC, DEC) – repeat 6 times. (24)
Round 23: (2 SC, DEC) – repeat 6 times. (18)
Stuff the part.
Round 24: (1 SC, DEC) – repeat 6 times. (12)
Round 25: DEC – repeat 6 times. (6)
Fasten off, cut the yarn, and hide the tail inside the part.
Snout
Crochet with brown yarn.
Round 1: 6 SC into the amigurumi ring.
Round 2: (1 SC, 3 SC in one stitch) – repeat 3 times. (12)
Round 3: (3 SC, 3 SC in one stitch) – repeat 3 times. (18)
Round 4: (5 SC, 3 SC in one stitch) – repeat 3 times. (24)
Round 5: (5 SC, DEC, INC) – repeat 3 times. (24)
Rounds 6-7: 24 SC
Round 8: (7 SC, 3 SC in one stitch) – repeat 3 times. (30)
Rounds 9-11: 30 SC
Fasten off, leave a long yarn end for sewing.
Attach the snout, making sure one of the snout’s points (which started as a triangle) is facing downward, and the other two points are on the upper part of the head.
Facial Details
Create a slight indentation in the eye area.
Embroider the nose and mouth on the protruding part of the snout to form a smile.
Attach eyelashes to the eyes (from the back), and glue the eyes onto the head in the indented areas.
Ears (Make 2)
Crochet with brown yarn.
Round 1: 6 SC into the amigurumi ring.
Round 2: (1 SC, INC) – repeat 3 times. (9)
Round 3: 9 SC
Round 4: (2 SC, INC) – repeat 3 times. (12)
Round 5: 12 SC
Round 6: (INC, 5 SC) – repeat 2 times. (14)
Round 7: (INC, 6 SC) – repeat 2 times. (16)
Round 8: (INC, 7 SC) – repeat 2 times. (18)
Round 9: (INC, 8 SC) – repeat 2 times. (20)
Round 10: INC, 19 SC. (21)
Round 11: INC, 20 SC. (22)
Round 12: INC, 21 SC. (23)
Round 13: INC, 22 SC. (24)
Do not stuff the ear. Fasten off, leave a long yarn end for sewing.
One side of the ear has a slight increase, and these sides should face each other. Bend the elongated end and secure it with a stitch. Attach the ears to the head.
Body
Crochet with brown yarn.
Round 1: 6 SC into the amigurumi ring.
Round 2: INC in each stitch around. (12)
Round 3: (1 SC, INC) – repeat 6 times. (18)
Round 4: (2 SC, INC) – repeat 6 times. (24)
Round 5: (3 SC, INC) – repeat 6 times. (30)
Round 6: (4 SC, INC) – repeat 6 times. (36)
Round 7: (5 SC, INC) – repeat 6 times. (42)
Round 8: (6 SC, INC) – repeat 6 times. (48)
Round 9: 7 SC, INC, (3 SC, INC) – repeat 4 times, 7 SC, INC, (3 SC, INC) – repeat 3 times. (56)
Round 10: 12 SC, INC, 10 SC, INC, 32 SC. (58)
Rounds 11-13: 58 SC
Round 14: 38 SC, DEC, (7 SC, DEC) – repeat 2 times. (55)
Rounds 15-16: 55 SC
Round 17: 38 SC, DEC, (6 SC, DEC) – repeat 2 times. (52)
Rounds 18-20: 52 SC
Round 21: 36 SC, DEC, (5 SC, DEC) – repeat 2 times. (49)
Rounds 22-24: 49 SC
Round 25: (10 SC, DEC) – repeat 2 times, 25 SC. (47)
Round 26: 4 SC, DEC, (8 SC, DEC) – repeat 2 times, 21 SC. (44)
Round 27: 44 SC
Round 28: (8 SC, DEC) – repeat 2 times, 24 SC. (42)
Rounds 29-30: 42 SC
Round 31: (5 SC, DEC) – repeat 6 times. (36)
Rounds 32-34: 36 SC
Round 35: (4 SC, DEC) – repeat 6 times. (30)
Round 36: 30 SC
Round 37: (3 SC, DEC) – repeat 3 times, 15 SC. (27)
Round 38: 3 SC, DEC, (2 SC, DEC) – repeat 2 times, 14 SC. (24)
Rounds 39-40: 24 SC
Stuff the body. Fasten off, leave a long yarn end for sewing.
Attach the body to the head.
Belly with a Pouch
Crochet with yellow yarn.
Round 1: 6 SC into the amigurumi ring.
Round 2: INC in each stitch around. (12)
Round 3: (1 SC, INC) – repeat 6 times. (18)
Round 4: (2 SC, INC) – repeat 6 times. (24)
Round 5: (3 SC, INC) – repeat 6 times. (30)
Round 6: (4 SC, INC) – repeat 6 times. (36)
Round 7: (5 SC, INC) – repeat 6 times. (42)
Round 8: (6 SC, INC) – repeat 6 times. (48)
Round 9: (7 SC, INC) – repeat 6 times. (54)
Round 10: (8 SC, INC) – repeat 6 times. (60)
Round 11: (INC, 9 SC) – 3 times, INC, 29 SC. (64)
Rounds 12-13: 64 SC
Round 14: (8 SC, DEC) – 2 times, 44 SC. (62)
Rounds 15-16: 62 SC
Round 17: (7 SC, DEC) – 3 times, 35 SC. (59)
Round 18: 59 SC
Round 19: DEC, 20 SC, DEC, 35 SC. (57)
Round 20: 57 SC
Round 21: DEC, 18 SC, DEC, 35 SC. (55)
Round 22: DEC, 16 SC, DEC, SS, CH, turn, and continue in straight rows (back and forth).
Round 23: Skip the SS and starting from the next stitch: DEC, 14 SC, DEC, SS, CH, turn.
Round 24: Skip the SS and starting from the next stitch: 16 SC, CH, turn.
Round 25: 16 SC, CH, turn.
Round 26: DEC, 12 SC, DEC, CH, turn.
Rounds 27-28: 14 SC, CH, turn.
Round 29: DEC, 10 SC, DEC, CH, turn.
Rounds 30-31: 12 SC, CH, turn.
Round 32: DEC, 8 SC, DEC, CH, turn.
Rounds 33-34: 10 SC, CH, turn.
Round 35: DEC, 6 SC, DEC, CH, turn.
Rounds 36-38: 8 SC, CH, turn.
Round 39: 3 SC, DEC, 3 SC. (7)
Round 40: 7 SC.
Edge of the piece, then single crochet along the front side in a crab stitch.
Sew the belly to the body, with the protruding part of the body facing the rear (it will be where the tail is attached).
Attach the head, slightly tilting it forward.
Upper Legs (Make 2)
Crochet with brown yarn.
Round 1: 6 SC into the amigurumi ring.
Round 2: INC in each stitch around. (12)
Round 3: (1 SC, INC) – repeat 6 times. (18)
Rounds 4-8: 18 SC
Round 9: (4 SC, DEC) – repeat 3 times. (15)
Rounds 10-11: 8 SS, 7 SC. (15)
Rounds 12-14: 15 SC
Round 15: (4 SC, INC) – repeat 3 times. (18)
Change to a brown thread. Start the row on the side of the oval.
Round 6: 44 SC through the back loop (only this round).
Rounds 7-11: 44 SC
Round 12: DEC in the PS, 11 times, 6 SC, DEC, 5 times, 6 SC. (28)
Round 13: (DEC in the PS, 1 PS) – 3 times, DEC in the PS, 17 SC. (24)
Round 14: (1 PS, DEC in the PS) – 2 times, 1 PS, 17 SC. (22)
Rounds 15-17: 22 SC
Round 18: 3 SC, INC, 2 SC, INC, 15 SC. (24)
Round 19: INC, 3 SC, INC, 2 SC, INC, 3 SC, INC, 12 SC. (28)
Round 20: (INC, 4 SC) – 3 times, INC, 12 SC. (32)
Round 21: INC, 5 SC, INC, 6 SC, INC, 5 SC, INC, 12 SC. (36)
Round 22: INC, 7 SC, INC, 6 SC, INC, 7 SC, INC, 12 SC. (40)
Round 23: 28 SC, (1 SC, INC) – 6 times. (46)
Round 24: DEC, 7 SC, DEC, 6 SC, DEC, 7 SC, DEC, 18 SC. (42)
Round 25: DEC, 5 SC, DEC, 6 SC, DEC, 5 SC, DEC, 1 SC, (INC, 2 SC) – 5 times, INC, 1 SC. (44)
Round 26: (DEC, 4 SC) – 3 times, DEC, 24 SC. (40)
Round 27: DEC, 3 SC, DEC, 2 SC, DEC, 3 SC, DEC, 24 SC. (36)
Round 28: (DEC, 1 SC) – 3 times, DEC, 25 SC. (32)
Round 29: 1 SC, DEC, 2 SC, DEC, 25 SC. (30)
Round 30: 30 SC
Round 31: (3 SC, DEC) – 6 times. (24)
Round 32: (1 SC, DEC) – 8 times. (16)
Round 33: DEC – 8 times. (8)
Pull the stitches together, fasten off the yarn, and hide the end inside the piece.
Note that the legs have two bends.
Lower Legs (Make 2)
Start with yellow yarn, without a starting loop, crocheting an oval around a chain.
Chain 7.
Round 1: 3 SC in the second chain from the hook, 4 SC in the next chains, 3 SC in the last chain. Turn and crochet 4 SC on the other side of the chain. (14)
Round 2: INC – 3 times, 4 SC, INC – 3 times, 4 SC. (20)
Round 3: (INC, 1 SC) – 3 times, 4 SC, (INC, 1 SC) – 3 times, 4 SC. (26)
Round 4: (1 SC, INC) – 4 times, 5 SC, (1 SC, INC) – 4 times, 5 SC. (34)
You should have a nice oval shape. Change to brown yarn, starting from the side of the oval.
Round 6: 44 SC through the back loop (only this round).
Rounds 7-11: 44 SC
Round 12: DEC in the SS – 11 times, 6 SC, DEC – 5 times, 6 SC. (28) Make the decreases tight to prevent holes.
Round 13: (DEC in the SS, 1 SS) – 3 times, DEC in the SS, 17 SC. (24)
Round 14: (1 SS, DEC in the SS) – 2 times, 1 SS, 17 SC. (22)
Fasten off.
Baby Kangaroo
Head
Crochet with brown yarn.
Round 1: 6 SC into the amigurumi ring.
Round 2: INC in each stitch around. (12)
Rounds 3-4: 12 SC
Round 5: 6 SS, 6 SC. (12)
Round 6: INC in each stitch around, working 2 SC in each stitch. (24)
Rounds 7-9: 24 SC
Round 10: (2 SC, DEC) – 6 times. (18) Stuff the piece.
Round 11: 18 SC
Round 12: (1 SC, DEC) – 6 times. (12)
Round 13: DEC – 6 times. (6)
Pull the stitches together, cut the yarn, fasten off, and hide the yarn tail inside the piece.
Ears (Make 2)
Crochet with brown yarn.
Round 1: 4 SC into the amigurumi ring.
Round 2: (1 SC, INC) – 2 times. (6)
Round 3: (2 SC, INC) – 2 times. (8)
Rounds 4-5: 8 SC
Don’t stuff the piece. Fold it in half and slip stitch through the stitches, then fasten off, leaving a short yarn tail for sewing.
Body
Crochet with brown yarn.
Round 1: 6 SC into the amigurumi ring.
Round 2: INC in each stitch around. (12)
Round 3: (1 SC, INC) – 6 times. (18)
Round 4: INC, 2 SC, INC, 1 SC, INC, 2 SC, INC, 9 SC. (22)
Rounds 5-6: 22 SC
Round 7: 8 SC, (DEC, 2 SC) – 3 times, DEC. (18)
Round 8: 18 SC
Round 9: 8 SC, (DEC, 2 SC) – 2 times, DEC. (15)
Round 10: 15 SC
Round 11: (3 SC, DEC) – 3 times. (12)
Round 12: 12 SC
Round 13: (DEC, 1 SC) – 4 times. (8) Stuff the piece.
Don’t pull the stitches too tightly, secure the yarn, and leave a long yarn tail for sewing.
Tail
Crochet with brown yarn.
Round 1: 6 SC into the amigurumi ring.
Round 2: (1 SC, INC) – 3 times. (9)
Round 3: 9 SC
Round 4: (2 SC, INC) – 3 times. (12)
Rounds 5-7: 12 SC
Round 8: (3 SC, INC) – 3 times. (15)
Rounds 9-11: 15 SC
Round 12: (4 SC, INC) – 3 times. (18)
Rounds 13-16: 18 SC
Round 17: 6 SC, (2 SC, INC) – 4 times. (22)
Round 18: 2 SC, (3 SC, INC) – 5 times. (27)
Round 19: 27 SC
Round 20: 6 SC, (INC, 9 SC) – 2 times, INC. (30)
Round 21: 30 SC
Round 22: 7 SC, (INC, 10 SC) – 2 times, INC. (33)
Round 23: 33 SC
Round 24: 7 SC, (INC, 4 SC) – 5 times, INC. (39)
Rounds 25-26: 39 SC
Stuff the piece. Do not pull the stitches too tightly. Secure the yarn and leave a long yarn tail for sewing.
Assemble the kangaroo as follows:
Sew the upper legs to the body, leaving the bottom part unsewn to create a pouch for the baby kangaroo.
Attach the head to the body.
Sew the tail to the back of the kangaroo so that it can lean on it.
Assemble the baby kangaroo by sewing its head to its body, making sure to stuff it.
Attach the ears to the baby kangaroo, folding them slightly at the bottom before sewing.
Sew the upper legs and the tail to the baby kangaroo.
Embroider the baby kangaroo’s nose with black yarn and attach beads or safety eyes for the eyes.
Your baby kangaroo is now complete and can even stand on its own. Enjoy your crocheting!